火曜日, 9月 09, 2014

Using DFI memory controllers with the Altera PHY Interface (AFI) - Altera Wiki

Using DFI memory controllers with the Altera PHY Interface (AFI) - Altera Wiki


This is Google's cache of http://www.alterawiki.com/wiki/Using_DFI_memory_controllers_with_the_Altera_PHY_Interface_(AFI). It is a snapshot of the page as it appeared on 3 Sep 2014 01:48:17 GMT. The current page could have changed in the meantime. Learn more
Tip: To quickly find your search term on this page, press Ctrl+F or ⌘-F (Mac) and use the find bar.


Using DFI memory controllers with the Altera PHY Interface (AFI)

From Altera Wiki
Jump to: navigationsearch
0 / 5 (0 votes cast)
 

Contents

Overview

This article describes the basic method and limitations for how one might interconnect a memory controller using a DDR PHY Interface (DFI) to an Altera PHY IP core which uses the Altera PHY Interface (AFI). Altera has never tested this and this is purely a proposal from analyzing both interface specifications. DFI is not officially suported by Altera.


What is DFI?

The DDR PHY Interface (DFI) is a industry standard interface protocol that defines the connectivity between a DDR memory controller and a DDR PHY. The specification is managed by Denali Software Inc and allows for easy interchanging between DFI based PHY and memory controllers from different vendors, ASICs, etc


Whats is AFI?

The Altera PHY Interface (AFI) standardizes and simplifies the interface between controller and PHY for Altera’s DDR AltMemPHY and UniPHY IP based memory designs. It allows easy interchange of non Altera controller RTL with Altera's high-performance controllers by including the entire calibration logic (known as the sequencer) in the PHY.

AFI location diagram.jpg


Comparison of DFI and AFI

At a very basic level, AFI is a subset of DFI. Overall the interfaces are very similar however the DFI has some features that AFI does not support as listed in the following table:

AFI DFI Interface Comparison.jpg


AFI/DFI bridge proposal

In developing a bridge to convert DFI to AFI most signals should be able to be connected one to one on the supported sub-interface sections, with the exception of the write interface. These are listed as follows. (AlteMemPHY usually uses the ctl_<> signal name, UniPHY uses afi_<>. Care is required in setting the correct DFI parameters, as mentioned below.

Control Interface

dfi_address => ctl_addr/afi_addr

dfi_bank => ctl_ba/afi_ba

dfi_cas_n => ctl_casn/afi_cas_n

dfi_cke => ctl_cke/afi_cke

dfi_cs_n => ctl_csn/afi_cs_n

dfi_odt => ctl_odt/afi_odt

dfi_ras_n => ctl_rasn/afi_ras_n

dfi_reset_n => ctl_rstn/afi_rst_n

dfi_we_n => ctl_wen/afi_we_n


Write Interface

dfi_wrdata => ctl_wdata/afi_wdata

dfi_wrdata_en => see below

dfi_wrdata_mask => ctl_dm/afi_dm


Read Interface

dfi_rddata_en => ctl_doing_read/afi_rdata_en(_full)

dfi_rddata <= ctl_rdata/afi_rdata

dfi_rddata_valid <= ctl_rdata_valid/afi_rdata_valid

Status Interface

dfi_init_complete <= ctl_cal_success/afi_cal_success

dfi_dram_clk_disable => ctl_mem_clk_disable/afi_mem_clk_disable


Write Interface Functionality

The AFI write interface although similar to the DFI interface, it has an extra signal controlling the start of the DQS burst. Care needs to be taken to take the appropriate DFI information and generate this logic correctly. The following is a diagram showing two supported write modes on AFI, depending on whether a full rate or a half rate PHY is being used.


AFI write timing.jpg

As we can see, they dqs_burst signal goes high (or partially high in the half rate case) one clock cycle before the wdata and wdata_valid is asserted inline with the wdata. Also, (not shown here) is the timing relationship between the write data being presented on AFI relative to the write command being issued on AFI. This is determined by another AFI signal ctl_wlat which provides the controller the calibrated write latency value. The controller must drive ctl_cs_n (for the write command) and then wait ctl_wlat ctl_clk cycles before driving clt_wdata_valid and ctl_wdata.


The DFI write specification is shown in the following diagram (Figure 7 from the DFI specification):

DFI write timing.jpg

Once the write command is issued, wrdata_en is asserted tphy_wrlat cycles later, wdata is presented a further tphy_wrdata cycles after that.

There are plenty of options here to generate the required AFI logic depending on how the DFI controller is configured. The simplest might be doing the following:

  1. Set tphy_wrlat to ctl_wlat and tphy_wrdata to 1.
  2. Pass dfi_wrdata_en through a register and assign it to the AFI signal ctl_wdata_valid
  3. "OR" dfi_wdata_en and the registered version of it, and assign to ctl_dqs_burst  (or just the MSB bit in the half rate case, the LSB will be equivalent to ctl_wdata_valid) 
  4. dfi_wrdata connects to ctl_wdata directly


Read Interface Functionality

The read interface signals more or less line up one to one however one must ensure that the correct DFI controller has the correct parameter settings. The following diagram shows the timing required for AFI interfaces. Note that AltMemPHY half rate IP uses 2 bits for rdata_en and rdata_valid, these bits should be drive the same. Also note that afi_rdata_en is called ctl_doign_read with AltMemPHY IP. This stays high for as many clock cycles as local side beats that are required, ie. local_size (see Altera's EMI handbook for more info).

AFI read timing.jpg

DFI has the following timing on reads.

DFI read timing.jpg

To align this with AFI, trddata_en must be set to zero so that dfi_rdata_en is aligned with the read command. For AltMemPHY designs the calibrated read latency is presented to the AFI interface on signal ctl_rdlat, however UniPHY does not provide this information. This shouldn't be important for most DFI controllers as rddata_valid is provided by the PHY and the controller should be just waiting for it, however if tphy_rdlat is required to be set correctly, most likely one would have to use AltMemPHY.


Notes/Comments

  1. DFI is not officially supported by Altera
  2. The proposed solution in this article has never been tested
  3. Altera recommends using UniPHY IP on all new designs with device support 


External Links

  1. Altera's External Memory Interface Solutions Center
  2. Altera's External Memory Interface Handbook
  3. DFI Specification


Key Words

AFI, DFI, external memory PHY interfaces, Denali , Altera PHY interface, DDR PHY interface


© 2010 Altera Corporation. The material in this wiki page or document is provided AS-IS and is not
supported by Altera Corporation. Use the material in this document at your own risk; it might be, for example, objectionable,
misleading or inaccurate.Retrieved from http://www.alterawiki.com/wiki/Altera_Wiki
木曜日, 9月 04, 2014

【心得】5-4-A的血汗練法 (四輕空一戰一潛) @艦隊收藏 哈啦板 - 巴哈姆特

【心得】5-4-A的血汗練法 (四輕空一戰一潛) @艦隊收藏 哈啦板 - 巴哈姆特


板上現在沒什麼5-4的練等文呢

以下這個血汗練法主要是同時練數艘輕空母

輕空母速成 (經驗高,3-2基礎經驗一場320,5-4基礎經驗一場420)
水桶消耗較大 (大部分用在潛艦,如果有低等潛艦供替換,可減少水桶量)
耗鋁中等


板上因時間較久而被刪掉的5-4練等文:

5-4-F練船II

(以上為今年2月底的文章,當時還沒有觀測射擊,參考時請納入考量)


5-4海域情報 (艦隊これくしょん -艦これ- 攻略 Wiki*)
一般非血汗練法
可周回    可單點 (A、F點)
       A點三種組合,一種有輕母*1,一種有重巡*1
        F點三種組合,兩種有重巡*2,一種有重巡*1

我之前練重巡/航巡,在5-4周回時的組合:
走上路,1戰2重1航巡2空,全高速,帶四罐,6 烈風 2 流星改


接下來是正文了... 最近我使用的5-4-A血汗練法

有興趣的話可以看我之前發的日記文...


因為最近我有一批輕空母要練(最主要是RJ),所以用5-4-A練
當時的備選方案:
3-2-1血汗    4-3炸魚

5-4-A血汗的特點:
  1. 棲艦三種組合,有一種組合有輕空母*1,為了搶制空,要帶艦戰
  2. 經驗、風險(水桶消耗)都比血汗3-2-1大
    • 有一種組合有重巡*1,我方輕空母被打到容易中大破
    • 有一種組合是輪型陣,我方潛艦容易中大破


以下是我使用的組合(原本RJ47等,瑞鳳15等):

4輕母 1戰 1潛   制空權確保   複縱

RJ  75  流星改  天山(友永隊)   Ju87C改      15.5三連裝副砲
瑞鳳  44  32電探  流星改     九九艦爆(熟練)   彩雲
千代田 68  32電探  烈風改     彗星一二型甲   流星改
飛鷹  65  流星改  Ju87C改     32電探      零式艦戰21型(熟練)
比叡  95  46砲   15.5副砲    水觀        14電探
伊號  79  閃避罐*2


為了保障命中或回避
  陪練艦裝電探
  陪練艦等級建議至少50以上 (50以下不是不可,但可能損害較大、不易拿S)

旗艦閃亮亮,其餘四艘紅臉,潛艦四艘在輪替
  紅臉使MVP可以集中在旗艦
  旗艦閃亮,使MVP集中,也穩定火力 (降低損害風險)
  潛艦輪替,減輕疲勞累積,降低損害風險

水桶方針:
輕母中破    → 水桶
潛艦/戰艦大破 → 水桶
大部分水桶都用在潛艦身上,輕母其次,戰艦很少用到


每場消耗   (統計了50場)


耗鋁:平均19.8   5*2 + 10*6 + 15*8 + 20*16 + 25*13 + 30*4 + 35*1
水桶:平均0.46   0*27 + 1*23
油 56
 64


因為有些格子較大,容易耗鋁,適合放電探/副砲
但是為了讓RJ的MVP穩定一點,所以RJ的副砲是放在最小的格子 (因此會多耗一點鋁)

想要省鋁的話,可以把大格改成電探/副砲或其他裝備
不過會因此降低開場空襲,降低穩定度

把輕母換成正空母也可以,不過相對的耗鋁會增加 (搭載量較大)


其他個人練艦習慣:
重巡 → 5-4周回、演習
輕巡/驅逐 → 4-3
空母 → 陪練
輕母 → 5-4-A血汗
戰艦 → 演習、陪練


目前我文章中的組合並不泛用,
如果有人後續發展出泛用的組合,歡迎發文討論

劉備收義子劉封是為了壓制關羽和關平_書味頻道_新浪網-北美

劉備收義子劉封是為了壓制關羽和關平_書味頻道_新浪網-北美


劉備收義子劉封是為了壓制關羽和關平
 轉寄 列印
 汪宏華

  一、華容道活捉曹操是劉備稱霸的唯一機會,但三個和尚沒水吃

  常有人問我,《三國演義》中劉備到底錯失了幾次統一天下的機會?我说,看上去很多,實則只有一次——華容道!此后的機會都不是機會,是作者為了照顧漢室正統的面子,並追求故事情節的跌宕起伏而已。

  假設關羽在華容道不殺也不放曹操,而是生擒曹操,情況會如何?劉備必將複製劉邦垓下的逆轉與輝煌,一戰成功。接下來就只需要一邊挾曹操以令諸侯,一邊逼劉協禪讓了。但形勢一旦拖入三足鼎立,劉備就非常被動了,人家東吳只會在你弱小的時候與你聯合,稍許強大就會提防。反之,如果不聯合,就會出現這兩種情況:(1)關羽以忠漢之名先伐強魏,后滅弱吳;(2)劉備以重義之名先征弱吳,再滅強魏。但兩者都以失敗告終。可見,錯過華容道之后,劉蜀無論如何掙扎,都走不了多遠,小说的大部分篇幅都在證明這個道理。

  如此,我們就該追問了,后面關羽、劉備各逞個人英雄的失敗可以理解,緣何在赤壁人多勢衆也坐失良機呢?原來,世上不只有三個臭皮匠頂個諸葛亮,還可能是三個和尚沒水喝。人們常说,曹操得天時,孫權得地利,劉備得人和,但赤壁大戰收官之時,劉備已在人和上出現了問題,各巨頭同床異夢,另懷心思。

  二、諸葛亮和關羽在華容道同時背棄劉備,但用意有別

  首先來看諸葛亮。他本該意識到聯合東吳在理論和實踐上的不確定性,赤壁大戰前,他可是冒着生命危險拜見孫權、周瑜,好不容易舌戰群儒才實現了孫、劉聯合,但后來他為什麼卻要放走曹操並寄望孫、劉長期聯合呢?我在前面的文章中已論證過,諸葛亮必須要先促成三足鼎立,才可能偷梁換柱,以諸葛瑾“將荊州之兵以向宛、洛”,自己“身率益州之衆以出秦川”。另外,他非常相信諸葛瑾的能力,認為只要他在東吳,聯合就有保障。

  其次來看關羽。按说關羽深研《春秋》,完全懂得在殺曹與放曹之間,還有一條中庸之道——擒曹——可以選擇。這樣既可確保劉備勝券在握,又能報答曹操昔日之恩情,軟禁之時照樣上馬一提金下馬一提銀償還,真正是忠義兩全。但此時的關羽也發生了變化,過去是降漢不降曹,現在是忠漢不忠備。當初他參與結義,原是想“同心協力,救困扶危;上報國家,下安黎庶”,而不是要扶劉備稱帝。劉備也明白這一點,所以總是喜怒不形於色。但他的隱忍能瞞過別人,卻瞞不過與他朝夕相處的關羽。關羽從幾件事看出了兄長的異志:

  (1)許田打圍,劉備閃爍其詞地制止關羽殺曹操。當時的情況是,曹操用天子的寶雕弓、金鈚箭射中了一隻大鹿,群臣以為是天子所為,山呼“萬歲”,曹操卻“縱馬而出,遮於天子之前以迎受之。衆皆失色。”關羽見狀大怒,提刀拍馬想斬曹操,劉備搖手送目將他制止。過后劉備辯解是擔心投鼠忌器,誤傷了天子。實際上誰都知道,憑關羽的功夫,拿下一個曹操是絶不會失手的。關羽只得強忍着说:“今日不殺此賊,后必為禍。”他開始明白劉備留着曹操是想模仿劉秀,反奪天下,二度中興。這是劉、關之間出現的第一次意見分歧。

  (2)劉備執意聘請法家軍師諸葛亮。在關羽看來,諸葛亮慫恿劉備先取劉表、后取劉璋是不忠不義的法家做派,有朝一日他必定還會打獻帝的主意。所以,無論是“三請”之前,還是“三請”之后,關羽都不喜歡諸葛亮,哪怕是軍令狀賭輸了,也沒有折服之意。這是劉、關的第二次分歧。

  (3)劉備突然在新野收劉封為義子。關羽當時就質問劉備:“兄長既有子,何必用螟蛉,后必生亂。”劉備说:“吾待之如子,彼必事吾如父,何亂之有!”是啊,若真待之如子,將來把帝位也傳給這位長子,的確不會生亂,但劉備會這樣做嗎?關羽不信,故“不悅”。關公更大的不悅還在於劉備的做法是針對關平而來的。按規矩,劉、關、張既是比親兄弟還親的三位一體的兄弟,關平也理應享有繼承資格,關平在第二代人之中年紀居長,德能最強。但劉備不想接受這樣的事實,便收了劉封這位年齡更大“器宇軒昂”的義子,壓制關平。這是劉、關的第三次意見分歧。

  歷次爭執,劉備都拿出老大哥的氣勢和堂而皇之的道理,關羽都戒急用忍。直到華容道,關羽終於等到了千載難逢的機會,大刀一揮放走了曹操,讓劉備啞巴吃黃連。

  三、關羽組建自己的班子試圖只手補天,但漢朝氣數已盡

  進一步分析,我們可以發覺關羽放走曹操的終極目的也是為了促成三足鼎立。自從許田打獵回來,關羽就不再信任劉備,決心另起爐灶建立自己的班子,所以在千里尋兄的路上收了關平為義子,收了江湖好漢廖化、周倉為助手,他要獨自打天下,獨自踐履結義時報國安民的諾言。這也就是说,劉備懷疑他爭奪繼承權,完全是以小人之心度君子之腹而已。但關羽不在乎,他從《春秋》中學到了忠孝節義,也學到了隱微之道。

  應當说,關羽秘密籌劃只手補天也並非夢想,當時魏、吳兩地確實沒有誰能與他分庭抗禮。關羽先以斬顔良誅文醜、過五關斬六將將曹操變成為了驚弓之鳥。后來曹操聽说關羽來襲,直想遷都以避其鋒,接着又以單刀赴會讓魯肅等東吳文武噤若寒蟬。面對關羽修築的烽火台,東吳很多人都感到束手無策。這些都是關羽在決戰天下之前做的心理攻勢,不可謂不充分。另外,關羽還是在劉備漢中稱王,證明其異志不只是個傳说之后才興兵伐魏的,不可謂不仁至義盡。

  但關公沒有想到歲月會如此無情,自己的身體在走下坡路,后輩關平、廖化和周倉的能力又跟不上。與此同時,東吳和曹操手下卻是長江后浪推前浪,陸遜設奇謀義取荊州,司馬懿則力勸曹操不必遷都,嫁禍東吳,讓關羽經歷短短的“攻拔襄陽”、“水淹七軍”之后,很快就陷入了四面楚歌。

   我們说,關羽的忠漢既不同於董承的維護既得利益,也不同於伏皇后對獻帝本人的鐘愛,是出於對儒家思想和大漢盛世的捍衛,是出於華佗式的醫人醫國,但為什麼也遭到了多方的夾擊呢?因為關羽不識時務,誓死擁躉他的大漢王朝,而彼時的東漢畢竟已經衰朽到不可救藥了,需要改朝換代了,誰想保它誰就會成為各路諸侯合力摧拉的對象。盡管關羽的個人能力十分強大,曹、孫、劉、諸葛、司馬五方缺少任何一方都難以撼倒他,但失敗卻只是時間問題。他身首異處、分葬三地的悲壯結局,便是當時整個東漢四分五裂的寫照。隨着關羽這一擎天柱的傾頽,東漢也徹底失去了匡複的可能。

   節選自:《大起底:四大名著裏的本意與隱喻》/汪宏華 著

水曜日, 9月 03, 2014

台灣的勞工絕對有資格要求加薪!(9) – 2007-2012 國際勞動比較 | 鬼島狂想曲2.0

台灣的勞工絕對有資格要求加薪!(9) – 2007-2012 國際勞動比較 | 鬼島狂想曲2.0


台灣的勞工絕對有資格要求加薪!(9) – 2007-2012 國際勞動比較

睽違已久沒更新國際比較圖表又來啦!美國勞工部每年都會有一份國際勞工的比較報告,比較各國製造業的單位成本與勞工報酬。
今年的勞工圖表其實早在八月份就已經出來了,只是板主我太忙疏忽了更新,一直拖到現在(跪地)。
而敝人之前也發表過好幾次調查報告,讓大家更了解台灣勞工相對於其他各國的處境,雖然我們很努力工作生產,但勞工待遇卻被嚴重低估,跟其他國家相比實在難看,因此版主我時常在關注這類訊息,並且整理傳播出來,藉此喚醒大家的勞工意識。
廢話不多說,上幾個圖先!

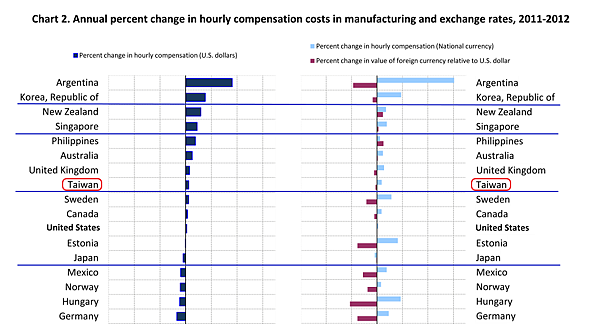
首先這是前年到去年(2011-2012),各國製造業時新的年成長率,左圖是用美元計價,右邊則是是用該國貨幣。
2011-12小時成本變動率    
▲ 2011-2012各國製造業時薪年成長率 (資料來源:美國勞工部)
從此張圖可看出台灣不管是用美元還是本國新台幣,其成長率都是非常之弱的,更別提近年因為美國QE的關係,台幣相對於美元還是升值狀態呢!
也就是說,即使台幣相對於美元升值,請台灣代工製造成本變高,但其影響仍舊是很微小的!
從美國勞工部提供的數據來看,2011年台灣製造業每小時時薪成本平均是274.45元台幣,到了2012年只微幅提升到279.49元,成長幅度只有1.8%!
但如果是用美元計價,成長率更只有1.3%而已!如果將2011到2012這一年平均匯率變化來看,台幣還貶值了0.6%!也就是說央行為台灣出口行業盡力將匯率壓低在可控範圍內,帶給勞工的附加價值只有0.7%而已!
也就是我們努力付出的心血勞力為耐斯的歪國人代工生產,只換來的薪水工資成長只有一咪咪而已。許多大老闆耳提面命的要央行貶值,創造出來的效果不過如此爾爾~繼續搞貶值創造競爭力不過是個屁而已!

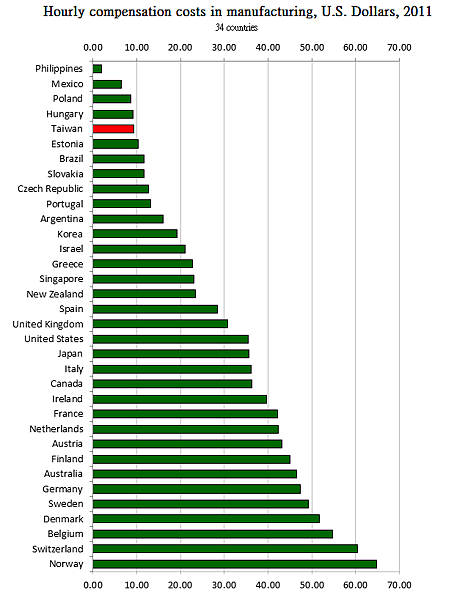
接著這張是經典圖表,是各國勞工時薪成本的排名,以美元計算。2011年台灣的外銷產品的出口價值換算成工作小時時薪只有不到10美元!在主要工業國家內的排名只贏匈牙利與菲律賓等開發中國家!
不只輸給韓國,還輸給歐債危機發病最嚴重的國家,希臘。
希臘本身是沒有什麼製造業的,主要是靠觀光服務業維生,結果本身我們的優質代工人力價值卻還遠輸給他們,如果這不是自甘墮落,那什麼才是自甘墮落?
2011_hcc    
▲ 2011年世界各國製造業的勞工時薪價值(資料來源:美國勞工部)
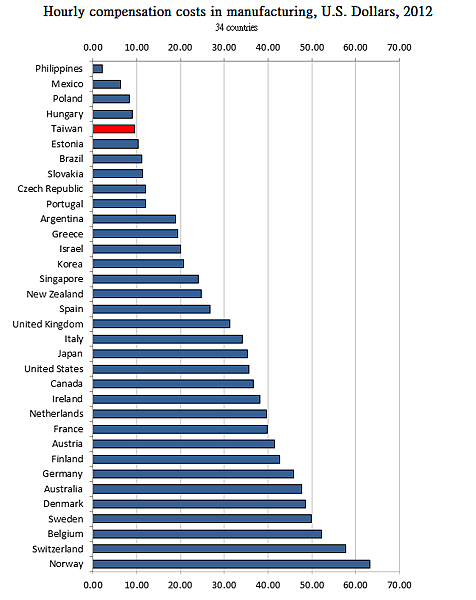
接著到了2012年,情況似乎沒有好轉,就如上面所提到,只微幅成長了1.3%!工人每小時時薪成本仍舊不超過10美元!
如此好用又便宜,又能大量製造出價廉物美的商品給全世界的人使用,請問這算不算台灣之光?製造業勞工個個都是無名英雄啊!
2012_hcc  
▲ 2012年世界各國製造業的勞工時薪價值 (資料來源:美國勞工部)
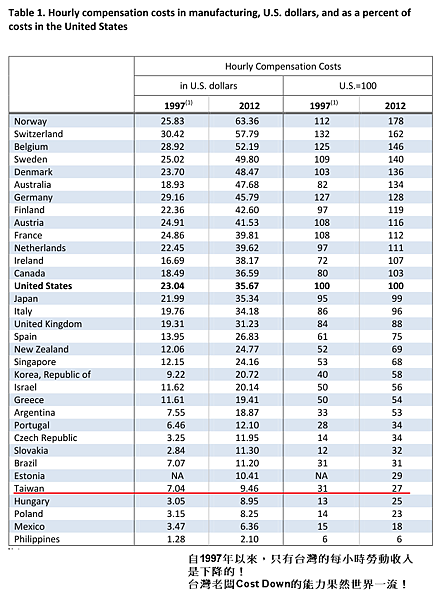
除了看2011, 2012兩年度情況之外,我們也來看看自1997年以來,各國的勞動時薪成本變化,可以非常明顯看出台灣在1997年只有7美元成本的時薪,但到了2012年卻也只微幅提升到9塊多而已!
如果將當年度的美元作為比較基準,以指數方式來看,台灣從1997年以來至2012年的時薪成本更是往下滑落!
也就是說,假設我是美國人,我在1997年聘請世界各國人來幫我製造東西,台灣人已經很便宜好用了;到了2012年請同樣的人做事情,價格卻變得更便宜。
在各國比較列表當中,只有台灣是人力成本往下掉的,物價會隨著通膨上漲,但台灣的人力成本卻是通貨緊縮,要在這樣的逆境求經濟成長,如果這不是蜜蜂咖啡逆風高飛,那什麼才是逆風高飛?
hrcost_from1997  
▲ 各國勞工時薪成本比較列表 Since 1997(資料來源:美國勞工部)
而這樣的特殊情況,美國勞工部也注意到了,因此也特地說明所有國家當中,只有台灣是成本降低的,利用對美元的貶值優勢創造競爭力。
notes
▲ 美國勞工部的說明
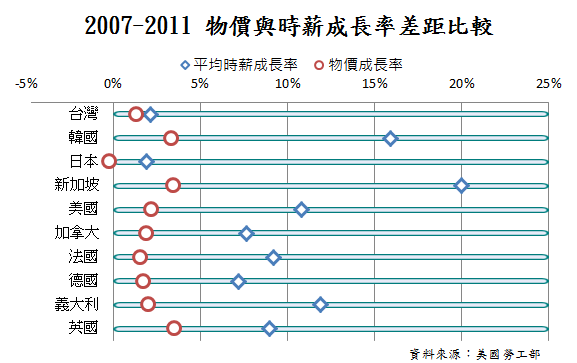
上面提到物價,就必須要來看看勞工時薪成本的成長率比對物價成長率,看看是否真的是「什麼都漲,就是薪資不漲」?
CPIvsHCC
▲ 2007-2011 時薪與物價成長率差距(資料來源:美國勞工部/製圖:永晨)
這是自2007年以來,各國製造業時薪成長率比對CPI物價成長率,可以看見台灣在這兩者間的差距是非常之小的!
即使日本歷經了20年的通貨緊縮,但其比對物價的差距仍舊比我們高,更不用提日本首相安倍晉三,為了刺激經濟除了讓日圓大貶,近期也提高消費稅,同時也要求企業給員工加薪。
但台灣呢?政府只有先對公務員加薪,再以「道德勸說」方式請企業給員工提高待遇,但老闆們卻只會要求政府貶值救經濟,然後不斷減稅降低企業經營成本,然後再說企業不賺錢,不能給員工加薪,卻還有錢炒房地產,房子一棟一棟的買?
如果這不是壓榨勞工,什麼才是壓榨勞工?是不是最後我們只能去跟非洲偏遠國家比較,慶幸我們沒有血鑽石血礦產就最幸福?
有沒有台灣一堆老闆得了便宜又賣乖的八卦?
台灣的競爭對手-韓國,在這段時間當中還經歷過差點讓他們傾家蕩產的亞洲金融風暴,受創非常慘重,但其人力時薪成本也沒有降低,附加價值也提昇了。
現今在很多產業,台灣早已經看不到韓國的車尾燈了!請問台灣過去企業一貫以員工是經營的最大成本而非人才資產,需要盡力縮編壓榨,創造出最大價值的思維成功了嗎?
如果老闆要說,是台灣勞工自己不努力提昇自我能力,又好吃懶做,無法為公司提供更多的價值,公司為何要給你加薪?用這種理由連反駁這樣的不合理現象更是大大自我打臉!
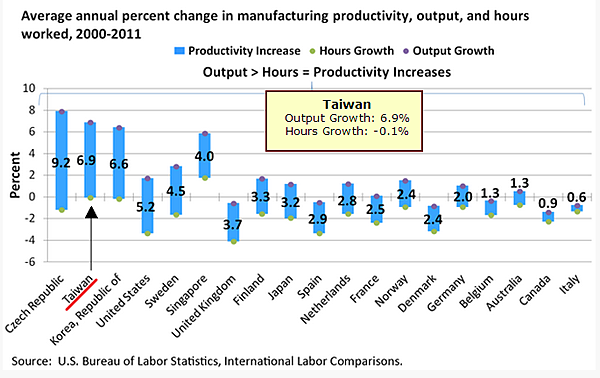
下圖顯示,台灣即使人力價值被低估,每小時所創造出的生產力與產出,自2000年以來排名位居前茅,屬於優等生之列。工時只略降了0.1%但產出卻多了6.9%!
年均生產成長率
▲ 各國製造業工時/生產力的成長率 Since 2000(資料來源:美國勞工部)
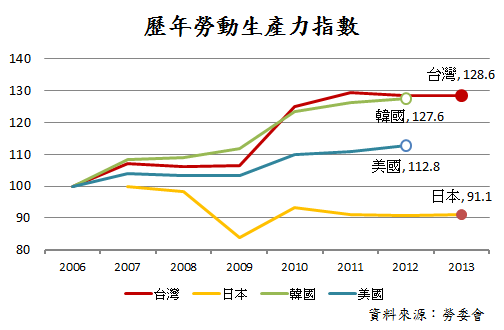
勞委會自行調查計算的各國生產力指數,以2006年為基準指數,台灣一樣是一路高飛,超過日韓等國!
請問這是好吃懶做嗎?
productivty
▲ 各國生產力指數(資料來源:美國勞工部/製圖:永晨)
提到工時,就不得不拿各國的工時排名出來「說嘴」,在每年的工時調查,台灣工時之長始終是位居前茅的,昔日的亞洲四小龍輪流在當「爐主」,比誰今年又當第一名。但可悲的是,工時長也就罷了,至少拼出來的過勞血汗也要有價值,其他的三小龍:香港、新加坡與韓國都創造了高人均GDP,企業也不吝為員工加薪,增加員工對公司的向心力,創造更多價值,付出更多,帶動良性循環。
wrk hrs 
▲ 四小龍國家與美、日、德、OECD國家平均的工時統計 (資料來源:OECD,勞委會/永晨整理) 
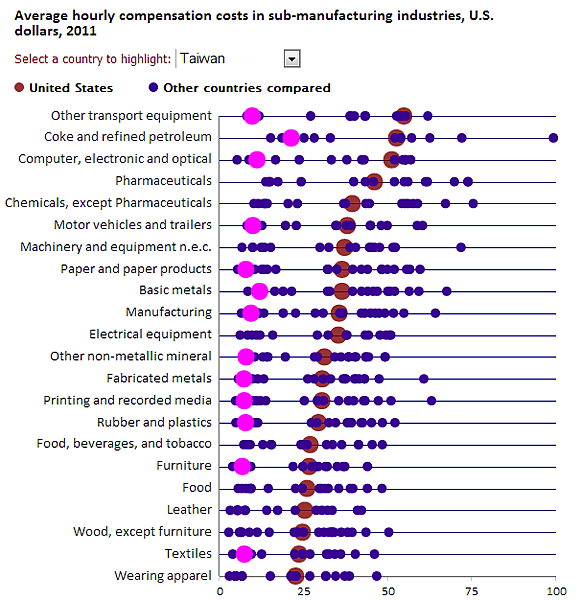
但台灣呢?為何勞工付出許多卻得不到該有的回報與創造更高附加價值?下面這張圖說明了一切:
製造業子產業時新城本
▲ 製造業各子產業的平均時薪成本(資料來源:美國勞工部)
粉紅色的圓圈代表台灣,代表台灣在各種製造業領域的人力成本都超級低,如果將這張放在整體產業供應鍊的位置來看,台灣根本是處於低附加價值,無法創造出更多利潤空間,只能拼命的,不斷的Cost Down,不斷的節省人力與物料成本,不培養人才不自我研發新技術,不提昇自我價值,只會繼續讓產業沉淪下去。
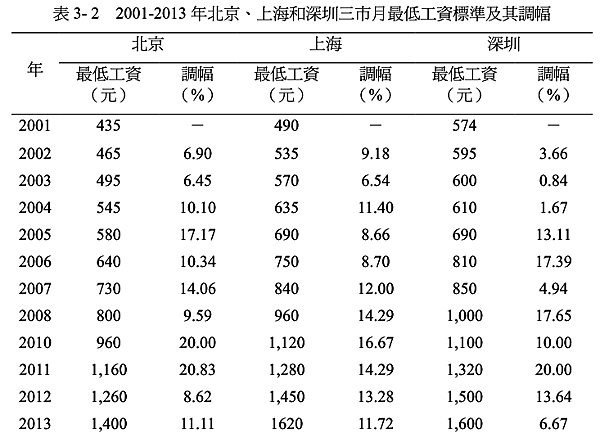
早期中國大陸以源源不絕又便宜的人力,將台灣許多製造業吸納過去,讓產業空洞化,失業人口大增,這些都是大家記憶猶新的歷史。而現今中國大陸早因應勞動成本不斷調昇而規劃將產業轉型,將勞力密集需要低廉工資的產業趕往內陸去,同時各城市每年也不斷調昇基本工資,保障勞工應該要有的生存權益。
但台灣呢?調漲基本工資只是個笑話,審議委員會也只是在演戲做個樣子,明明是跟基本生存權相關的薪資規定卻還要看經濟是否有成長?還要看CPI是否超過3%才會考慮調整?主導這倡議的六大工商團體要不要去吃屎比較快?
China minium wage 
▲ 中國主要城市的基本工資標準與漲幅(資料來源:蘇筑瑄(2013))
打了一堆又臭又長,洋洋灑灑,慷慨激昂,憤怒難消的抱怨批評真相揭露文,不知道身為辛苦勞工一份子的你作何感想?看到台灣商人為了搶單最愛用的砍價競爭,沒有創造附加價值,更別提產業升級,最後結果是傷敵五千,自損一萬。不但賠了夫人又折兵,連整個產業、人民甚至是國家都一起下去陪葬了!請問身為台灣人民的你作何感想?
還要繼續逃避?一直自我感覺良好嗎?
如果你不是人生勝利組,無法到他國工作甚至移民,是不是更應該覺醒為自己爭取權益?不讓這些錯誤的產業,錯誤的政策繼續荼毒台灣,畢竟這是你我生存的土地,自己的國家自己救!
別總是希望有神人明君能夠一夕改變、拯救台灣,真正的希望與機會在自己身上,想改變就要從自己開始!


參考資料:
Hourly Compensation Costs Report, U.S. Bureau of Labor Statistics | Division of International Labor Comparisons, 
BLS Spotlight on Statistics: International Labor Comparisons, U.S. Bureau of Labor Statistics | Division of International Labor Comparisons,
Productivity and Unit Labor Costs in Manufacturing, U.S. Bureau of Labor Statistics | Division of International Labor Comparisons,
Average annual hours actually worked per worker, OECD StatExtracts
國際勞動統計, 行政院勞工委員會 2013
中國大陸製造業單位勞動成本變動趨勢分析, Page.31, 蘇筑瑄 ,2013-06

2 THOUGHTS ON “台灣的勞工絕對有資格要求加薪!(9) – 2007-2012 國際勞動比較

月曜日, 9月 01, 2014

Damian Lillard hits buzzer-beating, game-winning, series-clinching 3 to oust Rockets in 6 (Video) | Ball Don't Lie - Yahoo Sports

Damian Lillard hits buzzer-beating, game-winning, series-clinching 3 to oust Rockets in 6 (Video) | Ball Don't Lie - Yahoo Sports


Damian Lillard hits buzzer-beating, game-winning, series-clinching 3 to oust Rockets in 6 (Video)

Dan Devine 
Ball Don't Lie
Dave Deckard of Blazersedge saw it coming.
So did Darius Soriano of Forum Blue and Gold.
Maybe you did, too. But for a moment there — after the Brooklyn Nets had forced Game 7, after the Dallas Mavericks had done the same, and after Chandler Parsons' putback reverse layup had given the Houston Rockets a 98-96 lead with nine-tenths of a second remaining — I thought Kevin McHale's crew might just pull this one out.
In that split-second, I forgot about Damian Lillard. And I'm afraid the Rockets did, too.
With 0.9 seconds left in Game 6, Blazers forward Nicolas Batum, who had just made a pivotal pull-up jumper (while appearing to slide his pivot foot in what wound up being an uncalled travel) to tie the game at 96 with 39 seconds remaining, prepared to inbound the ball, with Houston power forward Terrence Jones defending the ball. Blazers head coach Terry Stotts had stud power forward LaMarcus Aldridge, who'd torched the Rockets to the tune of 30 points through three quarters before missing all four of his tries in the fourth, stationed on the left block against the defense of Rockets center Dwight Howard, who had absolutely carried Houston down the stretch, scoring 13 points and grabbing six rebounds in the final frame.
The other three Blazers — Lillard, reserve point guard Mo Williams and shooting guard Wesley Matthews — were staggered along the right wing, opposite from Batum and Aldridge; the smart money seemed to be for Batum to look to work the ball into the big power forward for a chance to tie. (Batum confirmed this after the game.) But as the play began, Lillard streaked around the arc to the top of the key, completely losing Parsons with a quick first step. He came to the center of the court completely open; Batum gave him the ball.
"He was too open," Batum said. "I had to."
Lillard caught the pass, rose up and faded to his left from 25 feet out. He got the shot away, and in doing so reminded the Rockets what the Detroit Pistons,Cleveland CavaliersNew Orleans Pelicans and so many other teams have found out over the past two seasons: you don't want to give Damian Lillard one last shot.
Lillard's shot splashed through at the buzzer, giving the Blazers a 99-98 win over the Rockets that clinched a 4-2 win in this sensational best-of-seven first-round series. It was the perfect end to a game that had given us such gripping back-and-forth action — 14 ties, 16 lead changes, a fourth-quarter offensive duel between Howard and Robin Lopez, of all things — and the perfect cap to a series that featured three overtime contests and countless thrilling performances authored by two teams so evenly matched as to be ridiculous. Over the course of the six-game series, the Blazers and Rockets were separated by a grand total of two points, 672-670 ... and Houston was actually the one with 672, and they lost in six games. What an insane series.
Here's what it looked like inside the Moda Center when Dame dialed in, courtesy of Blazersedge's Ben Golliver:
I think it's fair to say that Portland's pretty stoked for the Blazers to be making their first trip to Round 2 since 2000
And here's what it looked like from courtside (spoiler alert: it looked cool):
"It hurts," said Howard, who finished with 26 points and 11 boards, capping a series in which he put up at least 20 and 10 in all six games while also playing as-good-as-you-can-expect defense on Aldridge and looking more like the Orlando Magic version of Dwight than anything we've seen in the last two years. "When you put everything you got on the floor, and somebody hits you with a dagger like that ... it's tough. It's a tough pill to swallow."
"Coach Stotts drew up a great play," Lillard told ESPN's Heather Cox after the game. "He wanted me to come to the ball hard. I figured it would be really tough to get my hands on it, but Mo and Wes, they set great screens. I was able to get to the ball, square my feet up, and I raised up and snapped my wrist. I got a good look, so I'm just excited it went in."
When you look back at the replay, though, Williams and Matthews didn't really set stonewall screens; this was just a matter of Lillard beating Parsons off the ball and to the spot to make the catch. But why was Parsons on Lillard in the first place? Why wasn't Patrick Beverley — who, even fighting through a fever and a month removed from a torn meniscus, is still the Rockets' best perimeter defender — locked on Lillard? Well, as Coach Nick of BBallBreakdown notes, Beverley was on Lillard at the start of the possession, with Parsons on Williams ... but the two switched assignments just before the whistle blew, apparently at the behest of James Harden, for reasons that remain unclear.
“We had a certain defensive scheme," Harden said after the game, according toJonathan Feigen of the Houston Chronicle. "He got loose and made a shot. He’s been making shots all night.”
But what was that "certain defensive scheme?" Why did that switch — whether called for by Harden, or dictated by something else — happen? Was it so that, once Lillard started running off the Williams and Matthews screens, Beverley or Harden could quickly pop out on Lillard and head him off at the pass as he flashed to the ball? If that was the case, then why didn't a second switch happen once Lillard broke free?
The latter likely owes to an instruction provided by McHale during a timeout immediately preceding the final possession:
It appears McHale is telling his players to just stay with their guys on the final possession, and not to switch their assignments or switch on screens. After the game, McHale told reporters that his specific instruction was not to give up a 3-pointer, a note confirmed by Howard during his trip to the podium. But if he's telling his players not to switch screens on the perimeter to make sure that nobody streaks wide open, how does that jive with the "no threes" plan?
Also, why was Harden on the court when what the Rockets needed was a stop? Why not take him off the floor in favor of backup point guard Jeremy Lin, who had helped hold Lillard to an 0-for-2 mark in the final quarter before that fateful final shot?
The more I watch the play and the more I think about it, the more thoroughly I'm confused about how the Rockets tried to accomplish the goal they said they wanted to accomplish. I think the Rockets were, too. This is probably why they didn't accomplish it.
"I've been telling you guys the whole series: You've got to always be in attack mode," Howard said. "You can never get back on your heels. And when you do, things like this happen."
“It’s the worst feeling I ever had in my life,” Parsons said, according to Feigen. “It’s crazy. You think the game is over, .9 seconds, you just got to get a stop and this locker room is totally different. We’re going home to play a Game 7 to move on. Instead, it’s over. There’s no words to describe the feeling.”
From Portland's perspective, though, Lillard — now an established late-game assassin who ranked fifth in the NBA in points scored in "clutch" situations (when the score is within five points in the final five minutes) and who shot 47 percent from the floor and 50 percent from long-distance in the final 30 seconds of games in which Portland was tied or trailed by three points during the regular season — had exactly the right words to describe what had just happened.
Those last two words kind of say it all, don't they?
Lillard finished with 25 points on 8-for-14 shooting, including a scorching 6-for-10 mark from 3-point land, to go with six rebounds, three assists and three steals in 43 1/2 minutes. Aldridge led the Blazers with 30 points and 13 rebounds. Harden scored a game-high 34 points on 9-for-15 shooting and went a perfect 12 for 12 from the foul line, to go with six assists, four rebounds and four steals to lead the Rockets. He becomes one of just 10 players since 1986 to put up 34 on 15 or fewer shot attempts.
The Blazers will face the winner of the first-round matchup between the San Antonio Spurs and Dallas Mavericks, which will be decided in Game 7 on Sundayafter the Mavericks tied the series at three games apiece on Friday. The Rockets will go home, devastated, and wonder what might have been.